A Range Is a Setup Type, Not a Pause
In August I closed a EURNZD range trade for +1.02R, exactly as planned. Full take-profit in front of the far edge, the way the playbook says a range trade ends.
Then the box broke. Price kept going, and went another 3.71R without me.
The trade wasn't wrong. The exit model was — it belonged to a setup that had stopped existing while I was still in it.
Most writing about ranges treats them as the boring part between trends: something to sit out, or to scalp with an oscillator. A plan-locked journal I've kept since early August, on top of a couple of months of trade reviews, taught me something more useful. A range is a setup type of its own, and the moment you classify it as one, half your trade-management decisions are already made. Including the decision about when it stops being one.
Everything below comes out of that journal — entry, stop and targets written down and timestamped before the outcome, so hindsight can't edit them. These are one trader's measurements, not a promise about anyone's results.
The type decides the exit — before the entry exists
My playbook names level types, and two of them look almost identical on a chart: an accumulation box (price loading up before a break) and a range box (price rotating inside). The distinction isn't cosmetic. Since playbook v1.3 the type picks the exit model:
- Accumulation break: partials into the move, then a runner — because the point of the trade is that price leaves the area.
- Range trade: full take-profit in front of the opposite edge — because the point of the trade is that price stays inside the area.
Same chart, same rectangle, opposite exit logic. If you don't name the type before the trade, you'll pick the exit model in the middle of the position — which in practice means you'll pick it with your P&L open.
The conversion — when the setup changes underneath you
Here is the EURNZD lesson stated properly: a range trade whose box breaks while you are still in it is no longer a range trade, and the exit has to change at that moment.
That's a rule in my playbook (v1.4) because the failure mode is so quiet. Nothing dramatic happens to you. You have a valid plan, a valid entry, and a target sitting in front of the far edge, doing precisely what it was designed to do. What changes is the market: the far edge gives way. And a target placed in front of a boundary that no longer exists is just a number.
The rule's operational form: when the opposite edge breaks with a close while your trade is running, the premise is gone — convert from full take-profit to partial at the edge plus a runner, because you are now in the setup type from the other column above.
The tempting lesson here is "I should have let it run." My journal says that's wrong. The same EURNZD trade held as a pure runner from the start — no partial — would have been stopped out on 17 August for −1.00R. Holding longer isn't the fix, and it isn't the lesson. The fix is that the exit model has to follow the premise, and the moment to switch is the moment the box breaks, not later when the move is obvious.
So the question to ask when a range's far edge gives way is not "should I hold?" It's "if I had no position right now, what setup would I say this is?" Answer that, then use that setup's exit rules.
One box, three roles
The second thing the journal taught me is that a box isn't a static object. The same rectangle plays three roles across its life, and my level vocabulary names them separately: accumulation box, support box, resistance box.
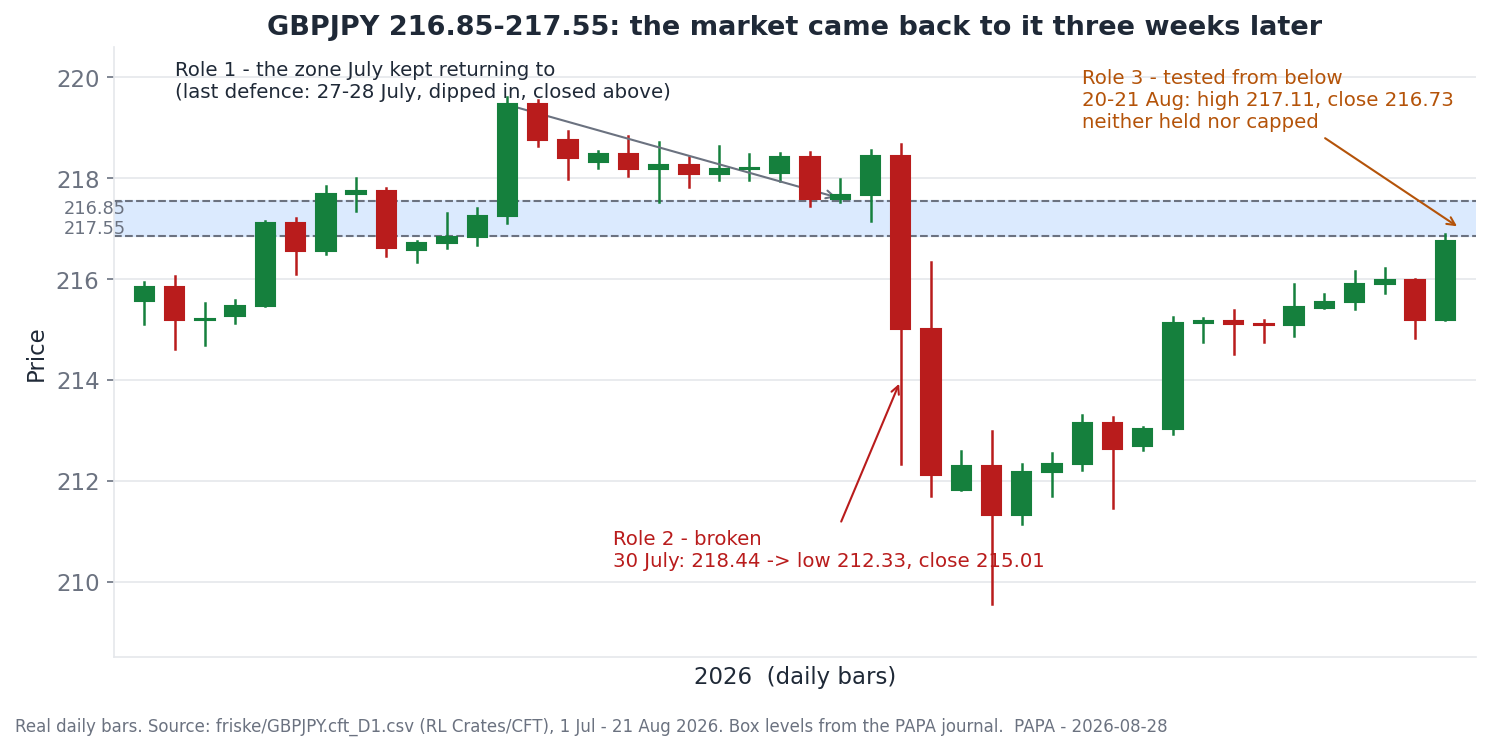
A live example from this summer: GBPJPY, the box 216.85–217.55 — described the way the bars actually look, not the way the story wants it to look.
Through July this was the zone the market kept coming back to. Not a clean floor: several early-July lows printed below it. But it's where price transacted, and the last two days before it mattered — 27 and 28 July — price dipped into the box and closed back above it.
On 30 July one daily candle went through it and didn't stop: open 218.44, low 212.33, close 215.01. Six hundred pips in a day.
Three weeks later, on 20–21 August, price climbed all the way back and traded into the underside of the same box. High 217.11. Close 216.73 — back underneath.
Here is where the tidy version would say "support became resistance." My own note that weekend says something less satisfying and more accurate: the box holds neither as resistance nor as support. Price sat on the boundary without direction, and it was still sitting there when I wrote this.
That's the lesson, and it's a better one than the tidy version: when a box breaks down, don't delete the lines. The market spent three weeks going the other way, then came back and spent two days deciding what to do at exactly those numbers. What it decides is the next question — and it's a question you can only ask if you kept the level on the chart.
The edge is not an entry. The reaction is.
Ranges tempt you into one specific sin, harder than any other structure, because the edge looks so clean: price touches the line and you fade it. My playbook forbids it. Checklist item 3 requires a reaction — a retest that holds, or a sweep through the edge that closes back inside. Never the first candle into the zone.
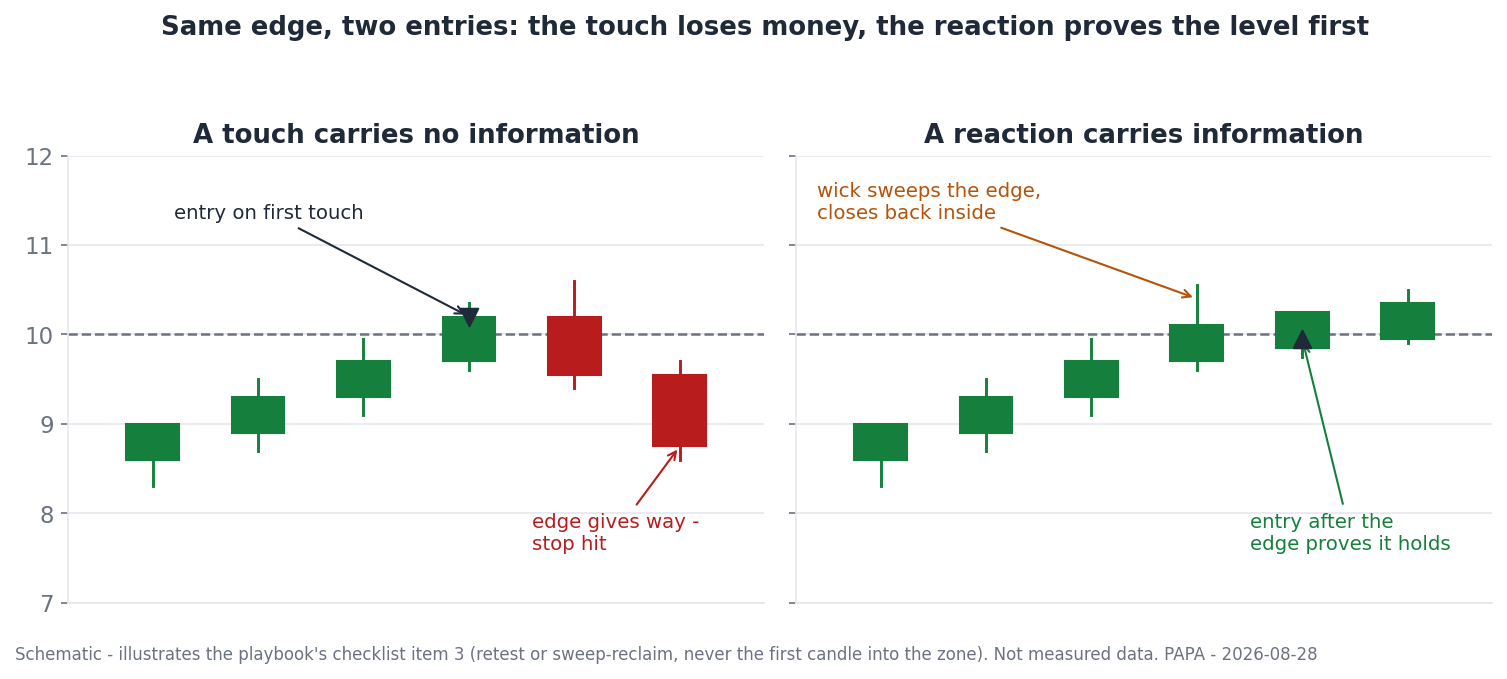
The reasoning is mechanical, not aesthetic. A touch carries no information — every breakout in history started as a touch. A reaction carries information: the market went there, tried the other side, and was refused. You give up entry price to buy that information.
In August I got one reasonably clean read on what that trade-off is worth. The same AUDJPY setup, same level, same target, taken two ways on two accounts: a patient retest-limit versus chased at market. The retest came out +2.47R, the chase +1.59R.
The honest footnotes matter here. The two weren't identical twins — the chased entry's stop was widened after entry, which changed its R-basis, and the two accounts had slightly different targets. It's one pair of trades on two accounts, and it proves nothing on its own. The journal keeps both entries for every plan precisely so this comparison accumulates over time. But it points the direction the mechanism predicts, measured on real fills rather than on a backtest's assumptions.
How good is the edge you're fading?
I ran a level-quality measurement across 3,113 logged alerts to find out which level histories were worth trading. The pattern that came out: few touches, all of which held, was the best signature — and many touches looked bad regardless of how those touches resolved.
That already inverts a popular belief. "It's been tested ten times, it's rock solid" — no. Every additional test consumes the resting orders that made the level hold.
But the rule didn't stay there, and it's worth showing why. On 21 August I changed it: count the rejections, not the touches. A level touched seven times where all seven were rejected is not the same object as one touched seven times that gave way twice — and raw touch-counting can't tell them apart. That refinement is a definition change, and it has not yet been re-measured on the same 3,113-alert population. It's in the playbook as a decision with the measurement outstanding, and I'd rather say so than present it as a finding.
The practical version for ranges: a fresh range with two clean rejections is the tradable one. An old range where each successive test is met with less conviction is a breakout waiting for a catalyst — useful too, but that's a different setup type with a different exit model.
The RR≈1 trap — a narrow range writes the bad trade for you
My journal keeps a forbidden list, and one entry on it is setups with a risk-reward around 1. I took seven of them before the rule existed. Six lost. The total was −6.1R.
(That number itself is worth a footnote. The playbook carried it as "6 of 6, −6.7R" for two weeks — until it was checked against the raw trade file and a seventh trade turned up, a winner, that had been missed. The rule didn't change. The number did. That is the whole argument for keeping the raw data next to the conclusions.)
Why do ranges generate these trades? Geometry. Your stop has to live outside the edge, beyond the sweep that would prove you wrong. Your target has to live in front of the far edge, because that's where the opposing orders sit. A narrow range eats you from both sides:
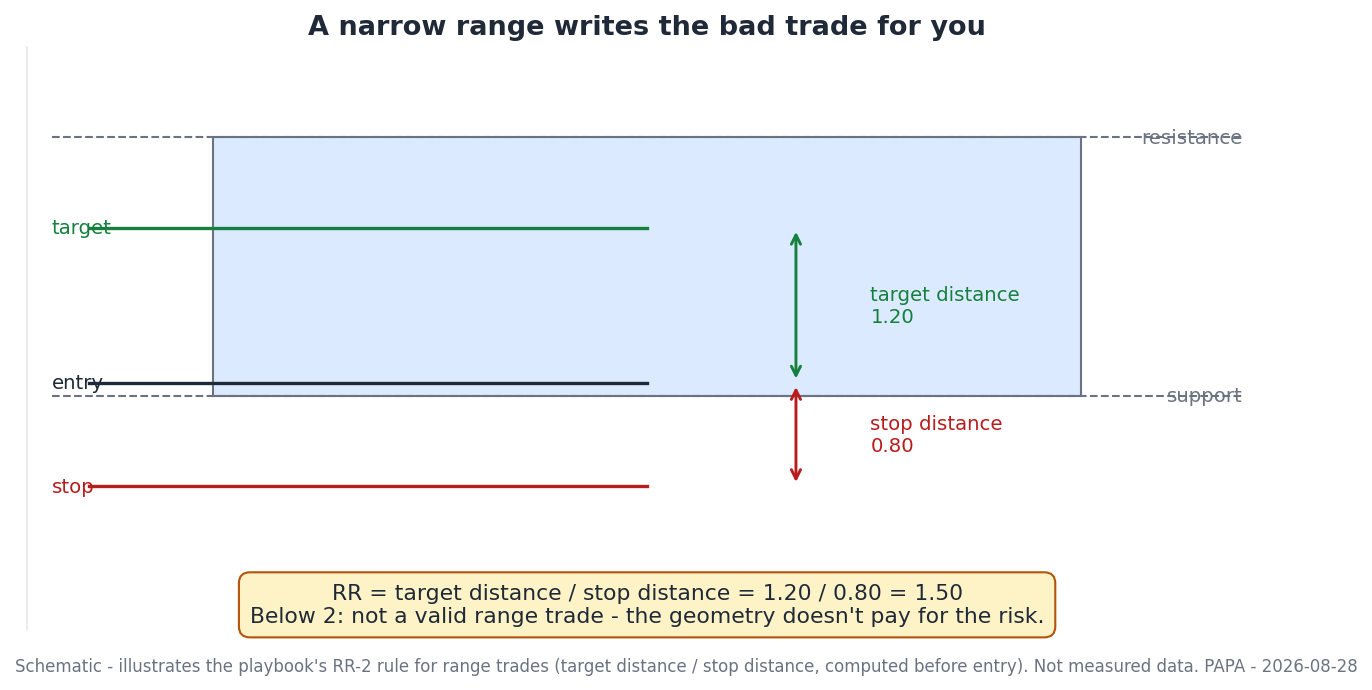
The defence is one division done before the trade: target distance divided by stop distance. My playbook requires the planned RR to clear 2 before a range trade is valid. If the range's height can't deliver that with an honest stop and an honest target, the range isn't tradeable as a range.
If you want the division done for you: Range RR Checker — box height, stop margin, target margin, one number back.
When you don't trade the range at all
This is the least-written-about case and the most common one: a perfectly real range that is simply too small to trade. The test above doubles as the filter. If the height of the box, minus the stop margin outside one edge, minus the target margin inside the other, doesn't leave at least twice your stop distance — there's no trade in the box. Not "a smaller trade." No trade.
What remains is a setup waiting for the box to break and re-enter the world as an accumulation-break trade, where the exit model, the stop and the arithmetic are all different.
Writing "no trade" in a journal feels like nothing happened. It isn't nothing — but it's worth being careful about what it's claimed to be worth. My rejection log is the fastest-growing table I keep, and right now it does not tell me my rejections were right: the setups passed on, scored on paper afterwards, come to roughly break-even overall. Some rules saved real money. One of them cost a trade worth more than everything it saved. The sample is small and the outcomes are extreme.
That's not a disappointing result — it's the point. Before rejections were logged, the question "is the discipline paying for itself?" had no answer at all. Now it has a number, and the number will get more honest with every month of data. A range you correctly didn't trade is a result, and results are the things you can measure.
The checklist, compressed
- Name the type before the entry: accumulation box or range box. The type picks the exit.
- If the box breaks while you're in it, the setup has changed — switch the exit model then, not when the move is obvious.
- A broken box keeps its lines. Where price goes when it returns is the next question.
- No entry on a touch. Retest or sweep-reclaim, always.
- Prefer ranges whose tests are being rejected, not merely counted.
- Do the RR division before the trade (checker). Under 2, walk away.
- A real range can still be untradeable. "No trade" is a valid outcome and worth logging.
Every rule above came out of a logged trade with a number attached — the EURNZD conversion, the seven RR≈1 setups, and (a mistake serious enough to earn its own write-up once the numbers behind it are re-verified) a trigger once written against a round number instead of a level.
That's the method behind PAPA, the trading journal I'm building: plans are locked before the outcome, rejections are logged like trades, and the level type is a first-class field — so the journal can tell you which of these mistakes you actually make, instead of leaving it to your memory.
This article describes one trader's logged measurements and playbook mechanics. It is not investment advice, and none of it says anything about what your results would be.
PAPA is the prop-firm journal these measurements are being built into — instrument checks, firm rules and compliance buffers, running on your own machine.
Get PAPA — free